What I Have Learned From Blogging

I will be the first to say that I was not excited about the whole blogging assignment. I was actually overwhelmed going into it because after looking at other blogs I thought theirs looked so much better than mine. Of course you gain the basic Idea on how it works, but the creativity is someone I was a little unsure about. I would totally say that it was a learn as you go process.

Some tools that I found effective was the preview just because I honestly used that so much due to me trying to perfect it the best I could. However one thing I did not find effective was imputing my photos because they were hard to move and place where I wanted them. I find this assignment effective not only because obviously our future revolves around technology, but also I will find it useful with my future. My minor is fashion merchandising, and let’s be real, there are oh so many fashion blogs. Therefore in many ways I feel like I have gained experience. If I could do it over, I think I would spend a little more time perfecting it to look more professional.

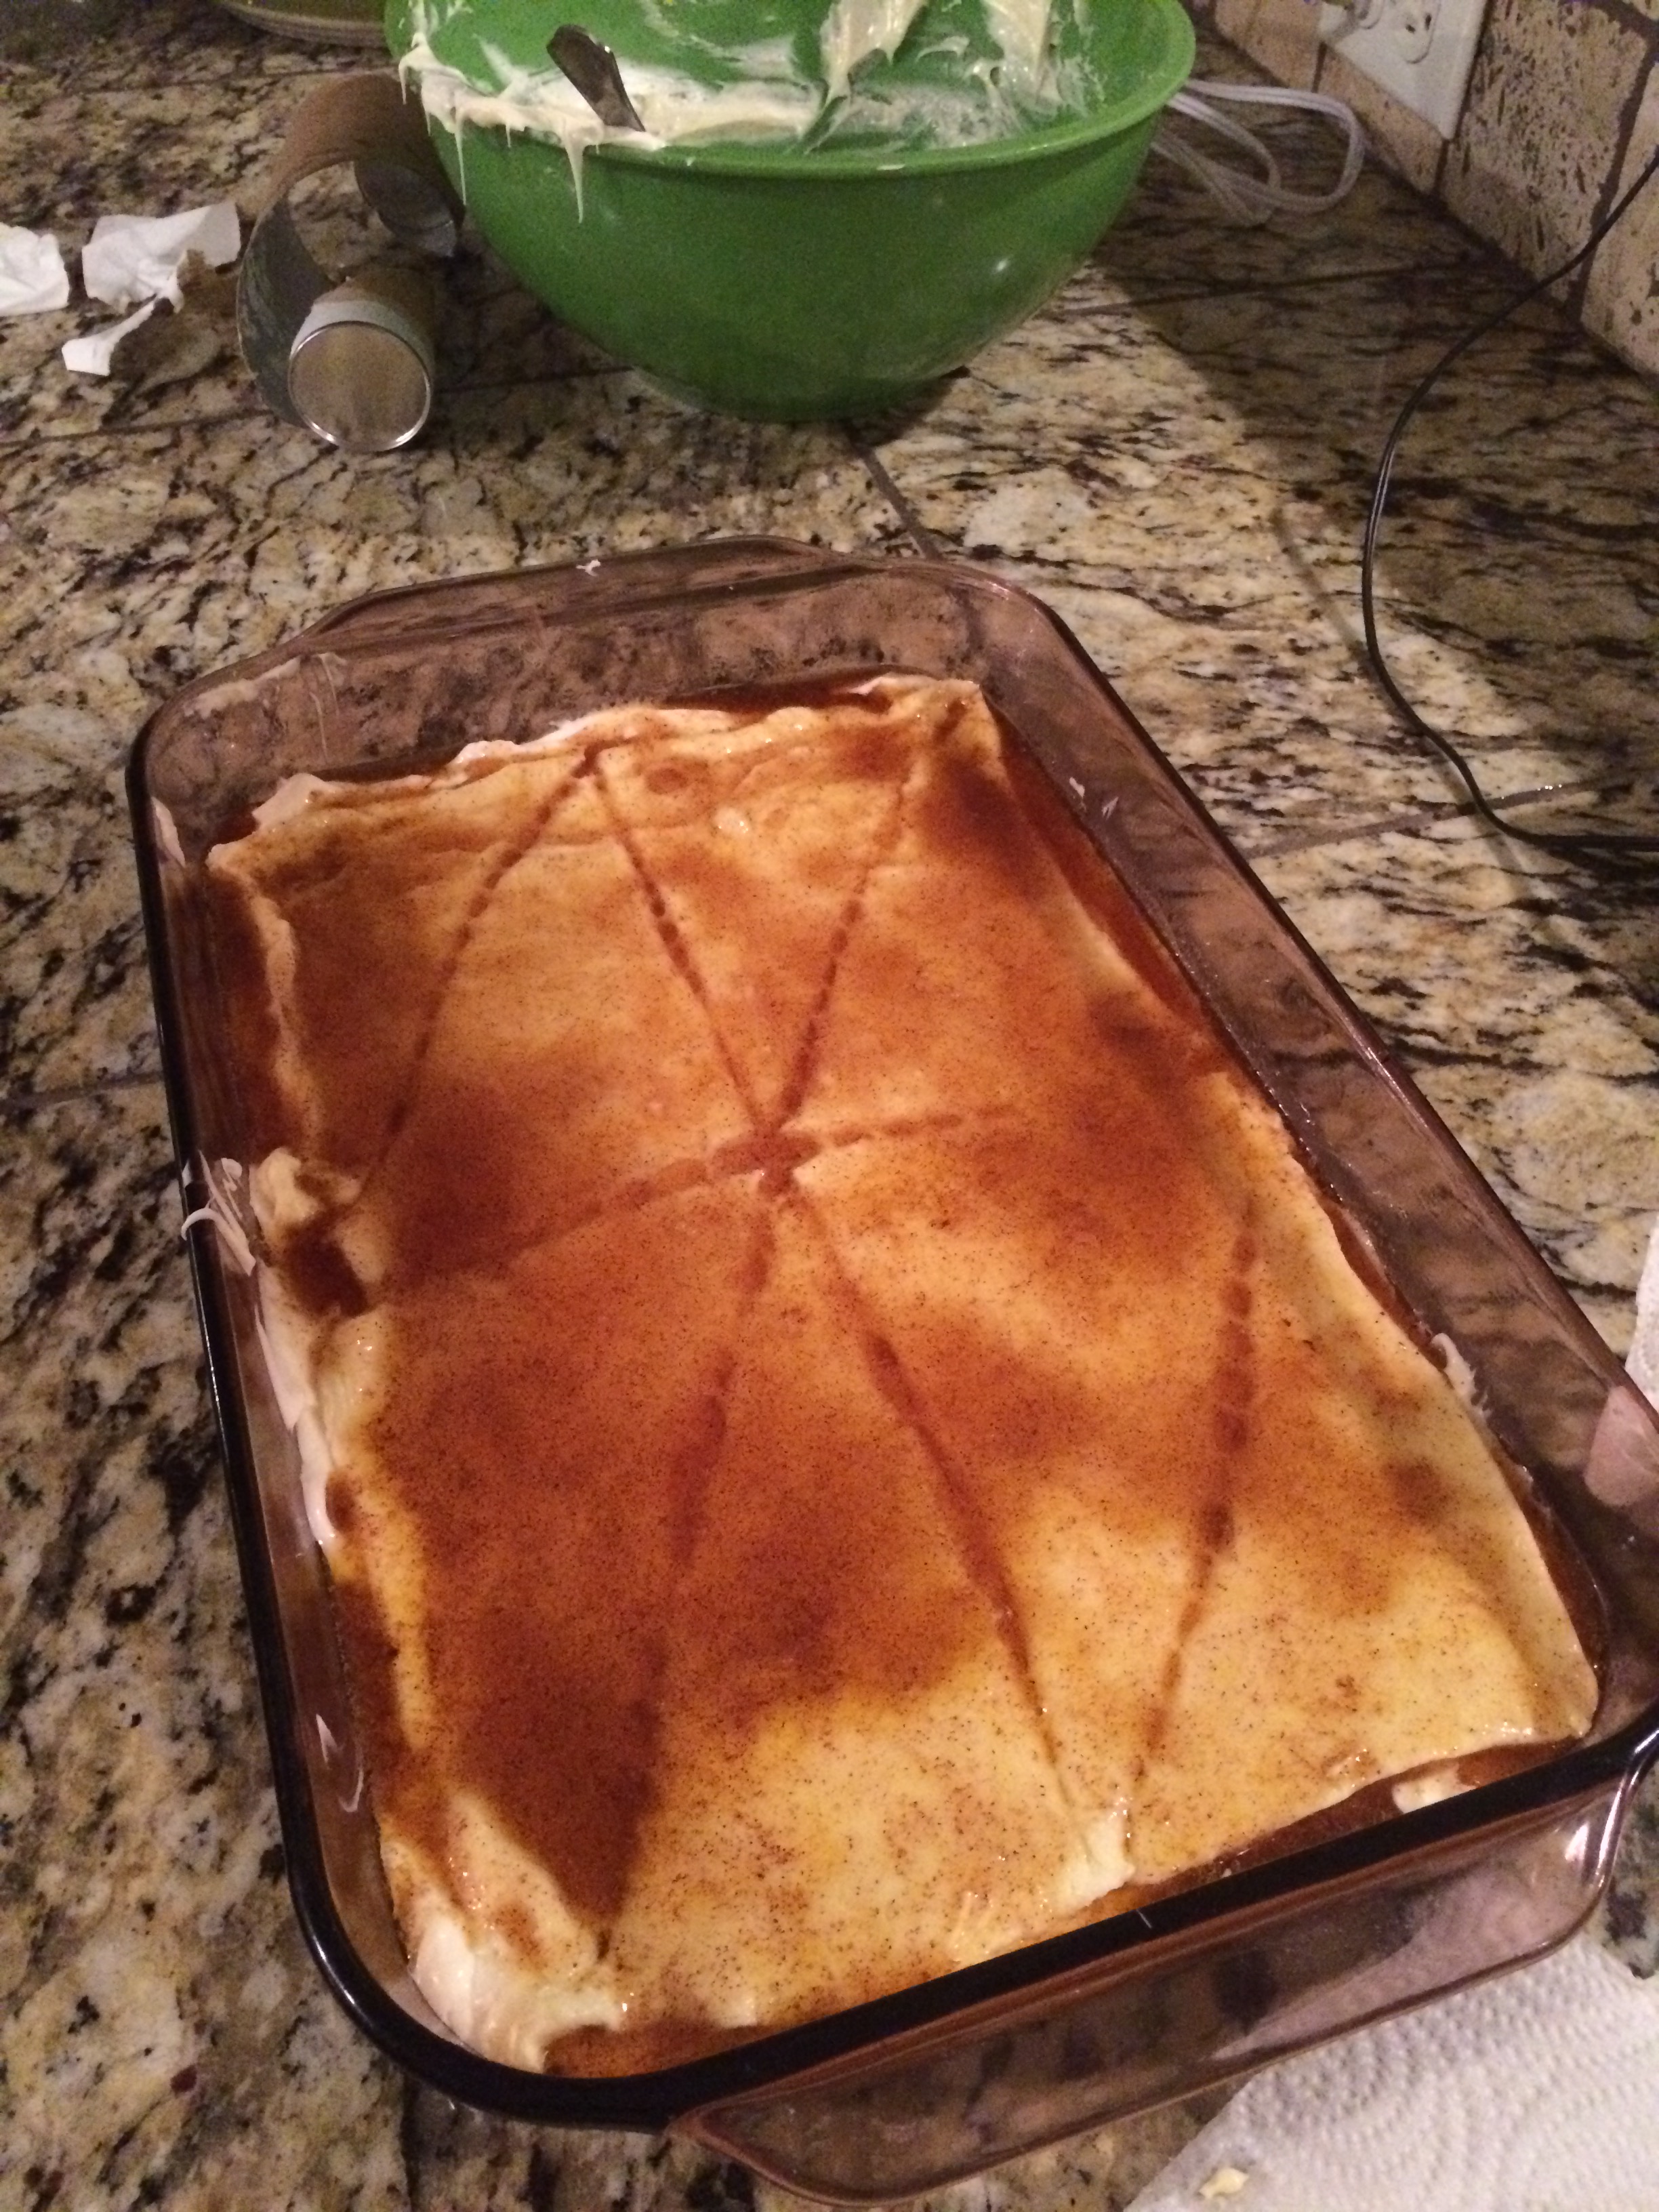
My most popular week was November 15th with seven views and five visitors. My most post was the Home Cooked Ribs with 3 views. I think I received the most views on this one because it can cater to guys more too. Unlike the sopapilla cheesecake which would probably cater more towards girls. I would say the most interesting thing about the stats data is the fact that visitors and viewers are two different things. Although my viewing stats aren’t the highest, I would say I have received more than expected.


Interview link


stats

Finals Quick Fix


Hey guys! So I hope everyone had a wonderful Thanksgiving. However now that Thanksgiving is behind us that now unfortunately means finals are around the corner. Therefore that usually means several sleepless nights, caffeine overload, and a very limited food supply. So today I am going to show you how to make chicken quesadillas that are fast, easy and will keep the hunger away.

You will need

  • Frozen grilled chicken strips
  • Corn or flour tortillas (it is really just your preference
  • Mexican cheese

First cook your frozen chicken in a skillet on the stove. The directions are on the back of the package if there are any further questions. Once the chicken is cooked grab two tortillas. I use corn just because that is what I prefer, but flour tastes just as well. Anyway place the chicken on top of one tortilla, add the amount of cheese you want, and then place the other tortilla on top. Next place the quesadilla in the skillet and warm it. I basically just keep it in there until it is toasted on either side and the cheese is melted. Then just cut it into four pieces and there you go you have a quesadilla!

This is honestly one of my go to snacks because it is so fast and easy. So with finals here I have no time to make a lengthy meal. Also if you make queso or guacamole it can make for a pretty filling meal. Something you could also try is adding beef fajita meat, but then again it is just your preference. However, good luck to everyone on finals, and I hope this helps out!

IMG_8625.JPGIMG_8626.JPG

29 Quesadillas to try

Basic White Girl Thanksgiving Treats

Good evening all! So I figured with the holidays approaching us I would make a festive treat. Therefore what did a basic sorority girl like myself come up with? Pumpkin Spice Rice Krispie Treats of course! I found this recipe on pinterest and I thought I would give it a test run before I brought it to Thanksgiving.

You will need,

  • 4 cups mini marshmallows
  • 6 cups rice krispie cereal
  • ½ tsp. cinnamon
  • ½ tsp. pumpkin pie spice
  • ¼ cup pumpkin puree
  • 3 Tbsp. butter
  • 9×13 baking sheet

The first thing to do that is super crucial make sure you pat the pumpkin puree with paper towels and let it sit for about 45 minutes. This is because the pumpkin is super moist and you want to dry it out as much as possible.

You will then want to take a large saucepan and melt the butter in it on medium heat. Once the majority of the butter is melted, then pour in the marshmallows. Once this mixture is melted then add in the cinnamon and pumpkin spice and the pumpkin puree. Stir until it is thoroughly mixed together and then add the rice krispies.

You will need a little arm power with mixing this, and do it fairly fast. Make sure that the baking sheet is close by and lightly grease it. Once this is done, spread the mixture into the pan. This is a little tricky just because it will want to stick to the spoon but just pat really hard and will work. Then just let sit and cool for about ten minutes.

I will just go ahead and say that this recipe did not work out too well for me. They turned out really moist and not as Krispy haha. I think this was just because I did not set the pumpkin puree out for 45 minutes; I just lightly patted it with paper towels. That’s why I mentioned it was crucial to dry it out. I also made double because my first batch didn’t cover the entire pan. So it was definitely an experiment for me, and I hope yall have better luck than me.

That’s all for now guys, Happy Thanksgiving!

indexiendextindexirndex

Home Cooked Ribs

Hey guys! So since the last time I posted I have gone home to visit the parents. So of course you know that means a weekend full of wonderful home cooked meals! Sunday especially means a huge feast. So I decided to help out in the kitchen and learn some new tricks from mom and dad. Therefore ribs were on the menu for Saturday!

Go ahead and set your oven to 350. First you take the meat and season it to your liking. We seasoned it with steak seasoning, onion power, and garlic power. Then run olive oil on them. You then going to take the ribs and lay them on tin foil (make sure it is enough to wrap around them) and lather them with Italian dressing. We made sure there was a little extra in the foil. Place the ribs that are wrapped in foil in the oven and you are going to want to bake for two hours. However this could be a scenario where you could bake to how you like your meat. Baking at two hours makes the meat tenderer, so you can bake for an hour and thirty minutes and it would be fine. So therefore it is just preference.

Now of course you know there cannot be ribs without some good old fashioned potato salad. So you are going to take a few red potatoes, depending on how many people you are trying to feed, and boil them until tender. Normally it takes around 13 minutes, but I just check them periodically. While this is taking place, you will also want to boil a few eggs as well, which only lasts 8 minutes. Once the potatoes are done drain the excess water and mash the potatoes. Next is where the tricky part happens. You are going to add mustard and mayo but I just estimated on how much to put in there. So it is kind of a taste test thing. You are also going cut up the egg whites and add them along with the yolks. Mix this entire mixture together and there you go you have potato salad!

This meal is a little time consuming, but so simple. It was nice to have my mom and dad to guide me for the first time, but it will definitely be something I can make on my own next time. Best of luck to you and until next time bloggers!

indexindexindex

Interesting Blogs

Hello beautiful people,

I have been looking at other blogs to get a little insight on how this whole process works. As you may already know, I have never blogged, so my skills are not exactly top notch yet. One thing about me is that I am a Pinterest addict, so of course I’ve found several blogs on there to look at. But I wanted to see more of what people like me who are new at blogging, what they were blogging about.

So as I was looking through most of my classmate’s blogs, I found several that I really enjoyed, and several that looked really advanced. But there was one that I really enjoyed because it was very similar to mine. It was called eatsntreaststxst by Annie Eichler. Unlike me, who has no idea what I’m doing in a kitchen, she actually has a passion for cooking and as cliché as it sounds, her posts actually make me want to cook something. So far all of her recipes have been ones that I would love to try.

IMG_8438

I especially liked the fried rice recipe. Because for one I absolutely love fried rice, and two because it didn’t seem very difficult. I have always been a little weary about making things like this, or even certain pastas because I feel like they never come out like they are supposed to, but Annie makes the directions seem fairly simple. Now don’t get me wrong there is a 9 out 10 possibility I’ll mess it up, but I’m really wanting to try her recipes.

I would totally advise someone to follow her blog if they were wanting to spice things up in the kitchen!


Sopapilla Cheesecake

Hey guys!

So one of my favorite desserts is Sopapilla Cheesecake. It is so simple and easy and oh so yummy. However, it is a very rich dessert so if you really aren’t that big into sweets, then this may not be something you are going to like. It’s also not messy and the preparation time is fairly short, and majority of the ingredients you most likely already have at home. But first let’s start with the ingredients you will need.

  • 2  8oz packages of cream cheese
  • 1 ¼ sticks of butter
  • 1 ½ cups of sugar
  • 2 teaspoons of vanilla
  • 2 8oz cans of crescent rolls
  • ½ teaspoon of ground cinnamon

First you are going to preheat your oven to 350 degrees. Now take a large mixing bowl and blend the cream cheese and 4tbs of butter until the mixture is creamy. You will then gradually add a cup of sugar into the mix, and then blend in a teaspoon of vanilla. Now spray a 13×9 pan with pam, and lay one can of your crescent rolls. The crescent rolls aren’t going to cover the pan exactly so you’ll have to stretch them out a little. Now with that being said, you can spread your mixture on top of the rolls, and then place the other can of crescent rolls on top of that. Next get a small saucepan and add 6tbs of butter, ½ a cup of sugar, 1tsp of vanilla, and ½ tsp of cinnamon, and just stir on medium heat until mixture is completely melted. Then pour it on top of the dough, and maybe use a spoon to make sure it spreads evenly. Now bake for thirty minutes.

I totally hesitated on doing this recipe because it’s one I’ve tried a million times and have the recipe down by heart, but it’s one of my favorites and I thought yall might enjoy it. Also when wondering how to store it, you can leave it out instead of the refrigerator, just keep it covered with something. I think overall this may have taken me 15 minutes, minus the bake time. But nevertheless it makes for a perfect dish to bring to gatherings since the holidays are approaching us. Anyway good luck guys I hope it turns out great for you!

IMG_8427

IMG_8428

IMG_8429

IMG_8430

IMG_8434

http://allrecipes.com/recipe/169305/sopapilla-cheesecake-pie/

Jalapeno Popper Chicken

Hey guys! So the recipe I tried this week is called jalapeno popper chicken breast, and I actually found this recipe on Pinterest. To sum that title up, it is just chicken breast stuffed with jalapenos and cream cheese. It was also a pretty simple dish to prepare. However, it did take me a little longer than what the directions said. And not to mention that I may have over cooked it a little bit, but it was still edible!

The ingredients you will need are,

  • 2 boneless chicken breasts
  • 6 oz. cream cheese, softened
  • 3/4 c. Monterrey Jack Cheese
  • 1/3 c.  jalapeno pepper, diced and deseeded
  • Flour
  • 2 eggs, whisked
  • 2 c. plain bread crumbs
  • Olive oil
  • Salt and pepper
  • Toothpicks

You are first going to preheat your oven to 350 degrees. Next go ahead and put the cream cheese in a bowl and stir it until it is creamy. You can then cut up the jalapeno peppers. Also make sure you deseed the peppers so they won’t be so spicy. Once you have cut up the peppers, toss them, along with the Monterrey Jack Cheese into the bowl of cream cheese, and mix together. Now you are going to take the chicken breasts season them how you want, and cute slits in the middle of them. You want to make sure the slit isn’t too big so the cream cheese mixture won’t spill out. Once the slit is made, take a handful of the cream cheese mixture and stuff the chicken breast. Then take about three toothpicks and close the slit so the mixture stays put. Next you are going to wisk together two eggs, lay out a good amount of flour, and the bread crumbs. The recipe calls for 2 cups but honestly that is too much, so you can just guess how much to cover the chicken breast. First you are going to dip the chicken in the whisked eggs, next lay it in the flour and cover it, then do the same with the bread crumbs. Once you have completed this, you will then drizzle a little olive oil in a skillet and place the chicken in it, and cook for about three minutes on each side. Once the six minutes in the skillet is finished, put the chicken on a cookie sheet and bake for about 23 minutes then ta da! You are done.

So by my picture you can tell I burnt it a little when I put it in the skillet, but hey it wasn’t completely ruined! Even though it took a little bit of time, it really is an easy recipe, and makes for a good meal. I included a side of lima beans and brown rice, but that’s just my preference and you could easily add whatever. I only made two chicken breasts because I was cooking for myself, but you could easily make more, because trust me, you will have plenty of the cream cheese mixture left over. But I definitely recommend this recipe, and wish all of you good luck!

chicken chicken 2 chicken 3 chicken 5

https://www.pinterest.com/pin/162340761544963825/

Dad’s Dove Wraps

Okay guys, so this week’s dish is one of my favorite appetizers my dad makes. He makes them at all the parties our family hosts and they are a huge hit. They are called dove wraps, and yes I mean dove as in the bird. My dad is a huge hunter and this is one of his many specialties. Let’s first reveal the ingredients besides the obvious factor that dove is one of them. You will need bacon, dove meat, jalapenos, and crème cheese. Two other supplies that will be needed are toothpicks, and a grill.

First let’s assume you have your ingredients all ready and laid out. You first want to season your dove breast how you like. I like to use garlic power and Tony Chachere’s Cajun seasoning, but it is your own preference. Next you are going to want to take the jalapeno peppers and wash them, cut them in half, and deseed them. Trust me this is really important because if not, your mouth will be on fire. Once this is done, you will notice the arch in the pepper, you will then fill it with the crème cheese. Then place the crème cheese filled jalapeno on top of the dove meat. Next you are going to wrap the jalapeno and meat in bacon, and then secure it with a toothpick. Now you will grill the wrap. It usually takes about ten minutes on each side but you just have to keep an eye on it.

I was a little hesitant when first making them, but they actually turned out better than expected. Keep in mind I had my dad on speaker phone the entire time I was making them, but they were actually edible. This recipe can either be used as an appetizer, or you could even add sides and make this into your meal. Trust me, they may look small, but they are extremely filling. And if you are not big on wild meat, I would at least say give them a try because they are very good. Also my picture does not give them justice, my camera does not take good quality. But I hope I gave you guys a new idea for a game day snack since we did just begin football season, and trust me if I managed I could do it, yall can do it.

dove wraps

Welcome To My Cooking Adventure

Hello everyone! First of all I would like to start by introducing myself. My name is Kambrie Laurent and I am a sophomore at Texas State University. So I have decided to blog about my adventures in the kitchen. However I am a little different than most bloggers when it comes to talking about their delicious meals. I myself cannot cook to save my life, hence the title “Welcome To My Cooking Adventure.”

First of all let’s back track a little bit. I am from Silsbee, Texas. Trust me, you’ll probably never hear that name ever again in your life. Anyway, it is a small town near the border of Louisiana. So therefore I have grown up devouring all kinds of southern specialties. Even more so due to the fact that my mom is a Louisiana native, and makes the best gumbo you have ever put in your mouth. However, her expert cooking skills were not in my favor since I can barely make toast. Nevertheless, I plan on spending this semester taking some of her best kept recipes and trying them out to the best of my ability.

Now I would just like you all to keep in mind that these recipes may or may not come out like they are supposed to, but I will be more than happy to give out the recipe and directions for you to try yourself. I am also going to try different courses, such as appetizers, main dishes, and desserts. Also the recipes I will be trying are all some of my favorite meals growing up, and are different cuisines. I am honestly really excited for this weekly experience and hope to gain a little more knowledge. Because trust me, cereal and hot pockets are getting old. Furthermore I would just like to say I hope you guys enjoy my adventures time in the kitchen!